Original Adult Nursing Marking Criteria for NMC OSCE
Original Adult Nursing Marking Criteria for NMC OSCE
 Many of the nurses who are preparing for NMC OSCE don’t know about the “Adult Nursing Marking Criteria” prepared together by three universities conducting the exam. The universities participated in making of Adult Nursing Criteria are University of Northampton, Oxford Brookes University and Ulster University. Adult Nursing Marking Criteria was developed to provide uniform assessment of all the stations involved in NMC OSCE across all OSCE facilitation centers. Adult Nursin Marking Criteria was first published on November 30th 2018, revised in May 24 2019 as well as on July 19 2019.
Adult Nursing Marking Criteria developed for OSCE Exam
Adult Nursing Marking Criteria is a set of criteria laid down by universities conducting NMC OSCE exam. These criteria are laid down for all the stations involved in NMC OSCE. In other words these are the key points you should keep in your mind while attempting any of the OSCE stations.
Why these criteria are important?
Each of the osce training centers have developed their own marking criteria before “Adult Nursing Marking Criteria” came to effect in November 2018. The latest revision of Adult Nursing Marking Criteria has come in to effect on July 19 2019. Sadly they all are still relying on those criteria rather than the original one.
For example in your real osce exam in Assessment/skills stations, it will be written in scenario that privacy is provided, consent is taken etc. Also, it is clearly mentioned in this criteria that there is no need to verbalize seven steps of hand washing. Still training centers are making you to train provide privacy, take consent for procedure, verbalize seven steps of hand washing etc.So in rush of verbalizing all unnecessary things, you will forget the most important ones. So, its important for you to have a look on adult nursing marking criteria before attempting your NMC OSCE exam.
Latest Adult Nursing Marking Criteria
The one we are following in this website is the 2021, Version 1.3 updated on. September 2nd 2021

Criterias laid down for different stations (APIE)
Assessment Station
1 Assesses the safety of the scene and the privacy and dignity of the patient.
2 Cleans hands with alcohol hand rub, or washes with soap and water and dries with paper towels, following World Health (WHO) guidelines.
3 Introduces self to person.
4 Checks identity (ID) with the person (the person’s name is essential, and either their date of birth or hospital number) verbally, against wristband (where appropriate) and documentation.
5 Checks for allergies verbally and on wrist band (where appropriate).
6 Gains consent and explains reason for the assessment.
7 Uses a calm voice, speech is clear, body language is open, personal space is appropriate.
8a Airway: Clear; no visual obstructions.
8b Breathing: Respiratory rate; rhythm; depth; oxygen saturation level; respiratory noises(rattle wheeze, stridor, coughing); unequal air entry; visual signs of respiratory distress (use of accessory respiratory muscles, sweating, cyanosis, ‘see-saw’ breathing).
8c Circulation: Heart rate; rhythm; strength; blood pressure; capillary refill; pallor and perfusion.
8d Disability: conscious level using ACVPU (alert, confusion, voice, pain, unresponsive); presence of pain; urine output; blood glucose.
8e Exposure: Takes and records temperature; asks for the presence of bleeds, rashes, injuries and/or bruises; obtains a medical history.
9 Accurately measures and documents the patient’s vital signs and specific assessment tools.
10 Calculates National Early Warning Score (NEWS) or Glasgow coma scale accurately.
11 Accurately completes document: signs, adds date and time on assessment charts.
12 Conducts a holistic assessment relevant to the patient’s scenario.
13 Disposes of equipment appropriately – verbalisation accepted.
14 Cleans hands with alcohol hand rub, or washes with soap and water and dries with paper towels, following WHO guidelines – verbalisation accepted.
15 Acts professionally throughout the procedure in accordance with NMC (2018) ‘The Code: Professional standards of practice and behaviour for nurses, midwives and nursing associates’.
Planning Station
1 Clearly and legibly handwritten answers.
2 Identifies two relevant nursing problems/needs.
3 Identifies aims for both problems.
4 Sets appropriate evaluation date for both problems.
5 Ensures nursing interventions are current/evidence-based/best practice.
6 Uses professional terminology in care planning.
7 Does not use abbreviations or acronyms.
8 Ensures strike-through errors retain legibility.
9 Accurately prints, signs and dates.
10 Acts professionally throughout the procedure in accordance with NMC (2018) ‘The Code: Professional standards of practice and behaviour for nurses, midwives and nursing associates.
Implementation Station
1 Clean hands with alcohol hand rub, or wash with soap and water, and dry with paper towels
2 Introduce self to person
3 Seek consent prior to administering medication
4 Check ID with person; verbally, against wristband (where appropriate) and paperwork
5 May refer to previous assessment results
6 Must check allergies on chart and confirm with the person in their care, also note red ID wristband
7 Before administering any prescribed drug, look at the person’s prescription chart and check the following are correct:
Person
Drug
Dose
Date and time of administration
Route and method for administration
Ensures:
Validity of prescription
Signature of prescriber
Prescription is legible
8 Identify and administer drugs due for administration correctly and safely
9 Provide a correct explanation of what each drug being administered is for to the person in their care
10 Omit drugs not to be administered and provides verbal rationale (ask candidate reason for non-administration if not verbalized)
11 Accurately documents drug administration and non-administration, including the details of the person administering the medication.
12 Acts professionally throughout the procedure in accordance with NMC (2018) ‘The Code: Professional standards of practice and behavior for nurses, midwives and nursing associates’.
Evaluation Station
Situation
1a Introduces self and the clinical setting.
1b States the patient’s name, hospital number and/or date of birth, and
location.
1c States the reason for the handover (where relevant).
Background
2a States date of admission/visit/reason for initial admission/referral to
specialist team and diagnosis.
2b Notes previous medical history and relevant medication/social history.
2c Gives details of current events and details the findings from assessment.
Assessment
3a States most recent observations, any results from assessments
undertaken and what changes have occurred.
3b Identifies main nursing needs.
3c States nursing and medical interventions completed.
3d States areas of concerns.
Recommendation
4 States what is required of the person taking the handover and proposes
a realistic plan of action.
Overall
5 Verbal communication is clear and appropriate.
6 Systematic and structured approach taken to handover.
7 Acts professionally throughout the procedure in accordance with NMC
(2018) ‘The Code: Professional standards of practice and behaviour for
nurses, midwives and nursing associates’.
Assessment Criteria laid down for Skill Stations

Administration of Inhaled Medication (New)
1 Introduces self, explains procedure and gains consent.
2 Cleans hands with alcohol hand rub, or washes with soap and water and dries with paper towels, following WHO guidelines.
3 Requests/assists the person to sit in an upright position.
4 Before administering any prescribed drug, looks at the person’s prescription chart and correctly checks ALL of the following:
Correct:
• person (check ID with person: verbally, against wristband (where appropriate) and documentation)
• drug
• dose
• date and time of administration
• route and method of administration
• diluent (as appropriate).
• Any allergies.
5 Correctly checks ALL of the following:
• validity of prescription
• signature of prescriber
• prescription is legible.
If any of these pieces of information is missing, unclear or illegible, the nurse should not proceed with administration and should consult the prescriber.
6 Removes the mouthpiece cover from the inhaler.
7 Shakes inhaler well for 2–5 seconds.
8 With a spacer device: Inserts metered dose inhaler (MDI) into end of spacer device. Asks the person to exhale completely and then to grasp the spacer mouthpiece with their teeth and lips while holding inhaler, ensuring lips form a seal.
9 Asks the person to tip head back slightly, and inhale slowly and deeply through the mouth while depressing the canister fully. 10 Instructs the person to use ‘single-breath technique’: breathe in slowly for 2–3 seconds and hold their breath for approximately 10 seconds, then remove the MDI from mouth before exhaling slowly through pursed lips
OR
Instructs the person to use ‘tidal breathing’ or ‘multi-breath technique’ if the person can’t hold their breath for more than 5 seconds (breathing in and out steadily five times).
11 Ensures the drug is administered as prescribed.
12 Instructs the person to wait 30–60 seconds between inhalations (if same medication) or 2–3 minutes between inhalations (if different medication), and shakes the inhaler between doses.
13 Cleans any equipment used and discards all disposable equipment in appropriate containers.
14 Cleans hands with alcohol hand rub, or washes with soap and water and dries with paper towels, following WHO guidelines – verbalisation accepted.
15 Dates and signs drug administration record (prompt permitted) verbalisation accepted.
16 Reassures the person appropriately. Closes the interaction professionally and appropriately.
17 Acts professionally throughout the procedure in accordance with NMC (2018) ‘The Code: Professional standards of practice and behaviour for nurses, midwives and nursing associates

For Aseptic Non Touch Technique (ANTT)
1 Cleans hands with alcohol hand rub and dons disposable gloves and apron.
2 Cleans trolley with detergent wipes (or equivalent) from furthest to nearest point.
3 Removes and disposes of gloves and apron. Cleans hands with alcohol hand rub.
4 Checks that all the equipment required for the procedure is available and, where applicable, is sterile (i.e. that packaging is undamaged, intact and dry, and that sterility indicators are present on any sterilised items and have changed colour where applicable).
5 Places all the equipment required for the procedure on the bottom shelf of the clean dressing trolley (or suitable equivalent).
(Equipment: sterile dressing pack, NaCl 0.9% for cleaning, alcohol cleaning wipes, wound dressing, alcohol hand rub, disposable apron.)
6 Takes the trolley to the person’s bedside, disturbing the curtains as little as possible.
7 Cleans hands with alcohol hand rub, or washes with soap and water and dries with paper towels, following WHO guidelines.
8 Dons a disposable plastic apron.
9 Opens the outer cover of the sterile pack and, having verified that the pack is the correct way up, slides the contents, without touching them, onto the top shelf of the trolley (or suitable equivalent).
10 Cleans hands with alcohol hand rub.
11 Opens the sterile field using only the corners of the paper.
12 Opens any other packs, tipping their contents gently onto the centre of the sterile field. Uses alcohol wipe to clean the saline solution for 30 seconds, allowing it to dry for 30 seconds.
13 Cleans hands with alcohol hand rub and dons sterile gloves.
14 Carries out and completes the relevant procedure using ANTT
Drapes sterile field around/under the wound area
States which hand will be ‘clean’ and which will be ‘dirty’
Dips gauze in saline solution, moving from the clean to dirty hand
Cleans wound from clean to dirty areas in a single stroke, taking care not to over-clean the wound. Applies new dressing
Avoids contaminating sterile field or key parts at all times.
15 Replaces bedcovers.
16 Disposes of waste appropriately – verbalisation accepted.
17 Cleans hands with alcohol hand rub, or washes with soap and water and dries with paper towels, following WHO guidelines – verbalisation accepted.
18 Checks the person is comfortable and is able to reach the call buzzer.
19 Acts professionally throughout the procedure in accordance with NMC (2018) ‘The Code: Professional standards of practice and behaviour for nurses, midwives and nursing associates’.
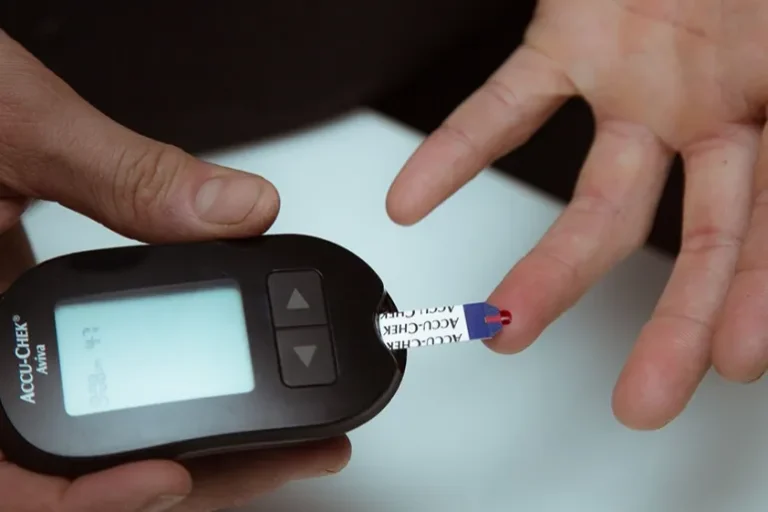
Blood Glucose Monitoring Marking Criteria
1 Assembles the equipment required and checks that the strips are in date and have not been exposed to air.
2 Explains the procedure with the person. Gains consent.
3 Cleans own hands with alcohol hand rub, or washes with soap and water and dries with paper towels, following WHO guidelines.
4 Dons a disposable plastic apron and non-sterile gloves.
5 Checks that the patient’s hands are visibly clean.
6 Takes a single-use lancet and takes blood sample from the side of finger, ensuring that the site of piercing is rotated. Avoids use of index finger and thumb.
7 Inserts the testing strip into the glucometer and applies blood to the strip. Ensures that the window on the test strip is entirely covered with blood.
8 Gives the patient a piece of gauze to stop the bleeding.
9 Ensures that all sharps and non-sharp waste are disposed of safely (including scooping method of re-sheathing, if used, and transportation of sharps) and in accordance with locally approved procedures.
10 Cleans hands with alcohol hand rub, or washes with soap and water and dries with paper towels, following WHO guidelines – verbalisation accepted.
11 Verbalises whether the result is within normal limits and indicates whether any action is required.
12 Documents the result accurately, clearly and legibly.
13 Acts professionally throughout the procedure in accordance with NMC (2018) ‘The Code: Professional standards of practice and behaviour for nurses, midwives and nursing associates’
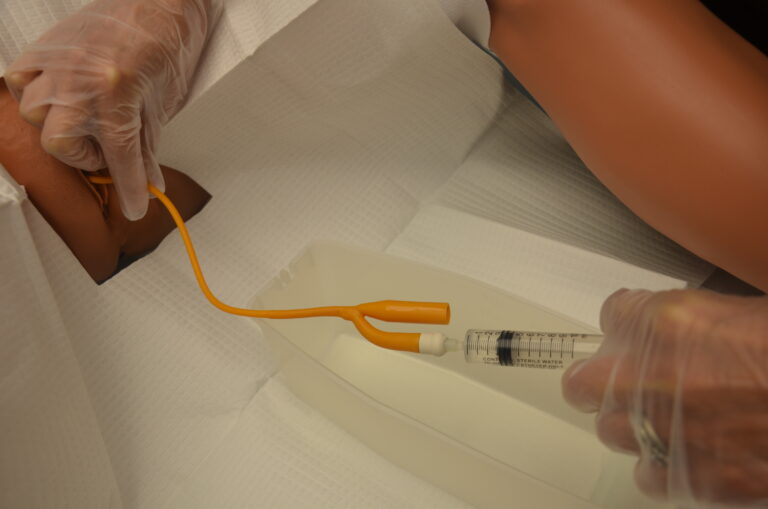
Catheter Sample of Urine (CSU)
1 Explains and discusses the procedure with the person.
2 Checks that any equipment required for the procedure is available and, where applicable, is sterile (i.e. that packaging is undamaged, intact and dry, is within the expiration date, that sterility indicators are present on any sterilised items and have changed colour, where applicable).
3 If no urine is visible in the catheter tubing: cleans hands with alcohol hand rub, or washes with soap and water and dries with paper towels, dons a disposable plastic apron and non-sterile gloves prior to manipulating the catheter tubing.
4 Applies non-traumatic clamp a few centimetres distal to the sampling port. Removes gloves and disposes appropriately.
5 Cleans hands with alcohol hand rub, or washes with soap and water and dries with paper towels, following WHO guidelines.
6 Dons non-sterile gloves.
7 Wipes sampling port with 2% chlorhexidine in 70% isopropyl alcohol and allows drying for 30 seconds.
8 If using needle and syringe: inserts needle into port at an angle of 45°, using a non-touch technique, and aspirates the required amount of urine, then withdraws needle.
If using needless system: inserts sterile syringe firmly into centre of sampling port (according to manufacturer’s guidelines) using a non-touch technique, aspirates the required amount of urine, and removes syringe.
9 Transfers an adequate volume of the urine specimen (approximately 10ml) into a sterile container immediately.
10 Discards needle and syringe into sharps container (if relevant).
11 Wipes sampling port with 2% chlorhexidine in 70% isopropyl alcohol and allows drying for 30 seconds.
12 Unclamps catheter tubing (if relevant).
13 Disposes of equipment including apron and gloves appropriately – verbalisation accepted.
14 Cleans hands with alcohol hand rub, or washes with soap and water and dries with paper towels, following WHO guidelines – verbalisation accepted.
15 Verbalises the need to label the container correctly and place into microbiology bag ready to send to laboratory as soon as the sample is obtained.
16 Acts professionally throughout the procedure in accordance with NMC (2018) ‘The Code: Professional standards of practice and behaviour for nurses, midwives and nursing associates’.
Fine-bore nasogastric tube insertion marking criteria
1 Introduces self.
2 Cleans hands with alcohol hand rub, or washes with soap and water and dries with paper towels following WHO guidelines.
3 Assembles the equipment required and dons a disposable plastic apron and non-sterile gloves.
4 Arranges a signal with the patient so that they can communicate if they wish to halt/stop, e.g. raising hand.
5 Assists the patient to sit in a semi-upright position in chair/bed, supporting head with pillows to ensure no head tilt forward or backwards.
6 Performs a NEX measurement by measuring the distance from the patient’s nose to their earlobe plus the distance from the earlobe to the bottom of the xiphisternum, adding 5- 10cm (if candidate does not add 5-10cm, this is not a fail), taking note of the measurement marks on the tube.
7 Checks that the nostrils are patent by asking the patient to sniff with one nostril closed. Repeats with other nostril.
8 Lubricates approx 15-20cm of the tube with warm water.
9 Ensures a reciever is to hand, in case the patient vomits. Ensure there is working oxygen and suction at the bedside.
10 Inserts the proximal end of the tube into the nostril, and slides backwards and inwards along the floor of the nose to the nasopharynx. Stops if encounters any obstruction and tries again in a slightly different direction or uses other nostril.
11 Asks the patient to start swallowing if they are able to, as tube passes down nasopharynx into the oesophagus.
12 Advances the tube through the pharynx as patient swallows until the measured indicator on the tube reaches the entrance of the nostril.
13 Recognises any signs of distress such as coughing or breathlessness, when the tube would should be removed immediately.
14 Uses adherent dressing tape to secure the tube to nostril and cheek.
15 Aspirates a small amount of the stomach contents using a 50ml or 60ml syringe, confirming that the tube is in position by using a pH indicator strip to confirm the presence of acid (the pH should be equal to or less than 5.5). Uses integral cap to cap the tube.
16 Disposes of equipment including apron and gloves appropriately – verbalisation accepted.
17 Cleans hands with alcohol hand rub, or washes with soap and water and dries with paper towels following WHO guidelines – verbalisation accepted.
18 Ensures that the patient is comfortable post procedure.
19 States the additional checks that may be undertaken to check tube positioning before commencing feeding (i.e. further checking with pH indicator strip immediately prior to each feed/in very specific circumstances radiologically).
20 Acts professionally throughout the procedure in accordance with NMC (2018) ‘The Code: Professional standards of practice and behaviour for nurses, midwives and nursing associates’.
Fluid balance (FB) marking criteria
1 Handwriting is clear and legible.
2a Accurately transposes the information onto the fluid balance chart.
2b Calculates the fluid intake balance accurately.
3 Calculates the fluid output balance accurately.
4a Calculates and documents the total fluid balance accurately.
4b Denotes negative or positive balance accurately.
5 Ensures strike-through errors retain legibility.
6 Prints and signs name on the chart
Basic Life Support (In Hospital Resuscitation – without defibrillation)
1 Ensures personal safety (safe environment).
2 Checks the person for a response: shakes shoulders, asks ‘Are you alright?’
3 Shouts for help when the person does not respond (if not done already).
4 Turns the person onto their back.
5 Opens airway and looks for any sign of obstruction.
6 Opens the airway using head tilt and chin lift (jaw-thrust if risk of cervical spine injury).
7 Establishes absence of breathing normally – for up to 10 seconds.
• looks for chest movement
• listens at the mouth for breathing
• feels for air on their cheek
• checks for carotid pulse (can be done at the same time as listening for breath).
8 Establishes no signs of life and calls 2222. Ensures resuscitation team are called and
resuscitation equipment requested (if alone, leaves the person to get help and
equipment).
9 Starts chest compressions:
• lower half of sternum
• heel of one hand on top of the other
• no pressure on the rib, abdomen and lower sternum
• arms straight.
10 Performs effective chest compressions:
• Compression depth 5–6cm
• Rate 100–120 compressions per minute.
11 After 30 chest compressions, completes 2 ventilations:
• head tilt
• gives ventilation while watching the chest rise over about 1 second (using a bagvalve mask)
• pauses, watching for the chest to fall
• gives a second ventilation
• the two ventilations should take no more than 5 seconds.
12 Recommences chest compressions and continues resuscitation with correct compression: ventilation ratio 30:2.
Intramuscular Injections
1 Explains and discusses the procedure with the person.
2 Before administering any prescribed drug, looks at the person’s prescription chart and correctly checks ALL of the following:
Correct:
• person (checks ID with person: verbally, against wristband (where appropriate) and documentation),
• drug
• dose
• date and time of administration
• route and method of administration
• diluent (as appropriate).
• Any allergies.
3 Correctly checks ALL of the following:
• validity of prescription
• signature of prescriber
• prescription is legible.
If any of these pieces of information is missing, unclear or illegible, the nurse should not proceed with administration and should consult the prescriber.
4 Cleans hands with alcohol hand rub, or washes with soap and water and dries with paper towels, following WHO guidelines.
5 Assembles equipment required and prepares medication.
6 Dons a disposable plastic apron. Closes the curtains/door and assists the person into the required position. Removes the appropriate garment to expose injection site.
7 Assesses the injection site for signs of inflammation, oedema, infection and skin lesions.
8 Cleans hands with alcohol hand rub, or washes with soap and water and dries with paper towels, following WHO guidelines. Dons non-sterile gloves.
9 Cleans the injection site with a swab saturated with isopropyl alcohol 70% for 30 seconds and allows to dry for 30 seconds.
10 Stretches the skin around the injection site.
11 Inserts the needle at an angle of 90° into the skin until about 1cm of the needle is left showing.
12 Depresses the plunger at approximately 1ml every 10 seconds and injects the drug slowly. (ONLY if using dorsogluteal muscles: pulls back on the plunger to check for blood aspiration.)
13 Waits 10 seconds before withdrawing the needle.
14 Withdraws the needle rapidly. Applies gentle pressure to any bleeding point but does not massage the site.
15 Applies a small plaster over the puncture site.
16 Ensures that all sharps and non-sharp waste are disposed of safely (including scooping method of re-sheathing and transportation of sharps) and in accordance with locally approved procedures.
17 Cleans hands with alcohol hand rub, or washes with soap and water and dries with paper towels, following WHO guidelines – verbalisation accepted.
18 Dates and signs drug documentation (prompt permitted).
19 Acts professionally throughout the procedure in accordance with NMC (2018) ‘The Code: Professional standards of practice and behaviour for nurses, midwives and nursing associates’.
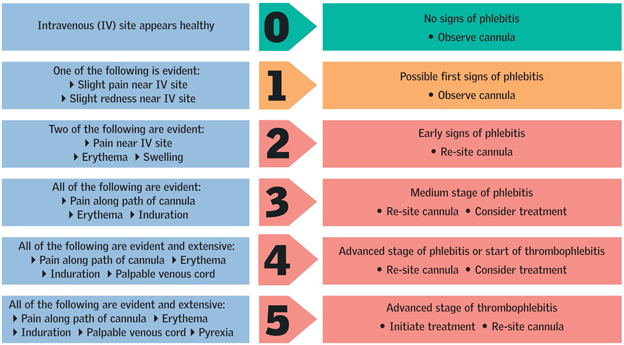
Intravenous (IV) flush and visual infusion phlebitis (VIP)
assessment marking criteria
1 Checks that all the equipment required for the procedure is available and, where applicable, is sterile (i.e. that packaging is undamaged, intact and dry; that sterility indicators are present on any sterilised items and have changed colour, where applicable).
2 Assesses the cannula and verbalises signs of phlebitis: pain, erythema (colour), oedema, palpable venous cord, pyrexia (identifies two for a partial and five for a full pass).
3 Cleans hands with alcohol hand rub, or washes with soap and water and dries with paper towels, following WHO guidelines.
4 States that the tray or trolley has been cleaned with detergent wipes (or equivalent) and places all the equipment required for the procedure on the bottom shelf of the clean dressing trolley (or suitable equivalent).
5 Dons a disposable plastic apron.
6 Takes the equipment to the person’s bedside in tray or trolley.
7 Gains consent and explains the procedure to the patient.
8 Before administering any prescribed drug, looks at the person’s prescription chart and correctly checks ALL of the following:
Correct:
• person (checks ID with person: verbally, against wristband (where appropriate) and
documentation),
• drug
• dose
• date and time of administration
• route and method of administration
• diluent (as appropriate).
• Any allergies.
9 Correctly checks ALL of the following:
• validity of prescription
• signature of prescriber
• prescription is legible.
If any of these pieces of information is missing, unclear or illegible, the nurse should not proceed with administration and should consult the prescriber.
10 Cleans hands with alcohol hand rub, or washes with soap and water and dries with paper towels. Dons non-sterile gloves.
11 Cleanses the end of the IV port with sterile alcohol wipes saturated with 70% isopropyl alcohol for 30 seconds, leaving to dry over 30 seconds.
12 Connects the pre-filled syringe to the port using an aseptic non-touch technique (ANTT) and flushes cannula using a pulsating action.
13 Asks the patient whether any discomfort is experienced while flushing.
14 Disposes of waste appropriately – verbalisation accepted.
15 Cleans hands with alcohol hand rub, or washes with soap and water and dries with paper towels, following WHO guidelines – verbalisation accepted.
16 Dates and signs drug administration record. Prompt permitted – verbalisation accepted.
17 Acts professionally throughout the procedure in accordance with NMC (2018) ‘The Code: Professional standards of practice and behaviour for nurses, midwives and nursing associates’.

Mid-stream specimen of urine (MSU) and urinalysis marking
criteria
1 Discusses the procedure with the person and gains consent.
2 Explains to the person how to perform MSU (women to part labia and clean meatus with soap and water from front to back, men to retract foreskin and clean around meatus.) Urinate a small amount and then stop flow of urine. Hold the specimen pot a few centimetres away from urethra and urinate until cup is approximately half full.
3 Cleans hands with alcohol hand rub, or washes with soap and water and dries with paper towels, following WHO guidelines.
4 Checks that all the equipment required for the procedure is available and, where applicable, is sterile (i.e. that packaging is undamaged, intact and dry; that sterility indicators are present on any sterilised items and have changed colour where applicable).
5 Gives person clean specimen pot. (Assessor then hands sample to candidate.)
6 Dons a disposable plastic apron and non-sterile gloves.
7 Dips reagent strip into the urine for no longer than 1 second.
8 Holds strip at an angle at the edge of the container.
9 Waits the required time before reading the strip against the colour chart – verbalisation accepted.
10 Disposes of equipment appropriately – verbalisation accepted.
11 Cleans hands with alcohol hand rub, or washes with soap and water and dries with paper towels, following WHO guidelines – verbalisation accepted.
12 Identifies the possible significance of the findings, provides appropriate health information to the person according to results, and informs of actions to be taken next.
13 Accurately documents readings according to reagent strip.
Pain assessment marking criteria
1 Introduces self and explains the assessment to be carried out and the rationale and importance of this.
2 Gains consent from the patient. Identifies the patient by checking name/date of birth or ID.
3 Considers the following aspects of pain:
3a P = provokes
Where is the pain? (point to area) What causes the pain? What makes it better? What makes it worse?
3b Q = quality
What does the pain feel like? Is it dull, sharp, stabbing, burning, crushing, shooting, throbbing? Is the pain intense?
3c R = radiating
Where is it? Is it in one place? Does it move around? Did it start somewhere else?
3d S = severity
How bad is it? Uses the universal pain scale to ascertain severity.
3e T = time
When did the pain start? How long has it lasted? Is it constant? Does it come and go? Is it sudden or gradual?
4 Acknowledges that the patient is in discomfort, and offers to make them more comfortable by repositioning.
5 Asks patient whether they have had any analgesia, and states will arrange for suitable analgesia.
6 Identifies the need to communicate with multidisciplinary team/doctor.
7 Identifies the need for regular reassessment.
8 Indicates the need to document findings accurately and clearly in the patient notes/charts.
9 Reassures the patient.
10 Acts professionally throughout the procedure in accordance with NMC (2018) ‘The Code: Professional standards of practice and behaviour for nurses, midwives and nursing associates’.
Peak Expiratory Flow Rate (Peak Flow Meter)
1 Explains the procedure to the person and obtains their consent.
2 Cleans hands with alcohol hand rub, or washes with soap and water and dries with paper towels following WHO guidelines. Dons non-sterile gloves and apron.
3 Assembles equipment.
4 Asks and assists the person to sit in an upright position.
5 Inserts a disposable mouthpiece into the peak flow meter or uses a single-use/reusable peak flow meter.
6 Ensures that the needle on the gauge is pushed down to zero.
7 Asks the person to hold the peak flow meter horizontally, ensuring that their fingers do not impede the gauge.
8 Asks the person to take a deep breath in through their mouth to full inspiration.
9 Asks the person to place their lips tightly around the mouthpiece immediately, obtaining a tight seal.
10 Asks the person to blow out through the meter in a short sharp ‘huff’ as forcefully as they can.
11 Takes a note of the reading and returns the needle on the gauge to zero. Asks the person to take a moment to rest and then to repeat the procedure twice, noting the reading each time.
12 Accurately documents the highest of the three acceptable readings.
13 Disposes of equipment appropriately – verbalisation accepted.
14 Cleans hands with alcohol hand rub, or washes with soap and water and dries with paper towels following WHO guidelines – verbalisation accepted.
15 Acts professionally throughout the procedure in accordance with NMC (2018) ‘The Code: Professional standards of practice and behaviour for nurses, midwives and nursing associates’.

Pressure area assessment marking criteria
1 Completes the Braden tool accurately, and correctly calculates the subscores and overall score based on the patient scenario and pressure damage identified.
2 Identifies the most vulnerable areas of pressure risk (formal anatomical or plain English terminology accepted):
• heels
• sacrum
• ischial tuberosities (buttocks)
• elbows
• temporal region of the skull
• shoulders
• femoral trochanters (hips)
• back of head
• toes
• ears
• spine.
To achieve full marks, the candidate needs to identify a minimum of 8 areas.
For partial marks, the candidate needs to identify a minimum of 5 areas.
3 Identifies signs that may indicate pressure ulcer development:
• persistent erythema (flushing of the skin)
• non blanching hyperaemia (discolouration of the skin that does not change when pressed)
• blisters
• discoloration
• localised heat
• localised oedema
• localised indurations (abnormal hardening)
• purplish/bluish localised areas
• localised coolness if tissue death has occurred.
To achieve full marks the candidate needs to identify a minimum of 7 areas.
For partial marks, the candidate needs to identify a minimum of 4 areas.
4 Documents findings and answers accurately, clearly and legibly.
Removal of Urinary Catheter
1 Explains the procedure to the person and informs them of potential post-catheter symptoms, such as urgency, frequency and discomfort, which are often caused by irritation of the urethra by the catheter.
2 Assembles the equipment required.
3 Cleans hands with alcohol hand rub, or washes with soap and water and dries with paper towels, following WHO guidelines.
4 Dons a disposable plastic apron and non-sterile gloves.
5 Having checked volume of water in balloon (see patient documentation), uses syringe to deflate balloon in full.
6 Asks person to breathe in and then out. As person exhales, gently but firmly with continuous traction removes catheter.
7 Cleans and dries area around the genitalia and makes the person comfortable.
8 Encourages person to exercise and to drink 2.5 litres of fluid per day.
9 Disposes of equipment including apron and gloves appropriately – verbalisation accepted.
10 Cleans hands with alcohol hand rub, or washes with soap and water and dries with paper towels following WHO guidelines – verbalisation accepted.
11 Verbalises asking the patient to inform the nurse when urine has been passed.
12 Acts professionally throughout the procedure in accordance with NMC (2018) ‘The Code: Professional standards of practice and behaviour for nurses, midwives and nursing associates’.
Subcutaneous Injection
1 Explains and discusses the procedure with the person.
2 Before administering any prescribed medicine, looks at the person’s prescription chart and correctly checks ALL of the following:
Correct:
• person (checks ID with person: verbally, against wristband (where appropriate) and documentation)
• medicine
• dose
• date and time of administration
• route and method of administration
• diluent (as appropriate).
• Any allergies.
3 Correctly checks ALL of the following:
• validity of prescription
• signature of prescriber
• prescription is legible.
If any of these pieces of information is missing, unclear or illegible, the nurse should not proceed with administration and should consult the prescriber.
4 Cleans hands with alcohol hand rub, or washes with soap and water and dries with paper towels following WHO guidelines. Dons a disposable plastic apron.
5 Assembles equipment required and prepares medication using non-touch technique.
6 Closes the curtains/door and assists the person into the required position. Removes the appropriate garment to expose injection site.
7 Assesses the injection site for signs of inflammation, oedema, infection and skin lesions. Rotates injection sites if having regular injections.
8 Cleans hands with alcohol hand rub, or washes with soap and water and dries with paper towels. Dons non-sterile gloves.
9 States would assess the cleanliness of the injection site. States that if the site is clean there would be no need to clean, however if required would clean with a swab saturated with isopropyl alcohol 70% for 30 seconds and allows to dry for 30 seconds.
10 Removes the needle sheath.
11 Gently pinches the skin into a fold.
12 Holds the needle between thumb and forefinger of dominant hand as if grasping a dart.
13 Inserts the needle into the skin at an angle of 90° (necessary for administering insulin)
and releases the grasped skin. (An angle of 45° is permitted if the candidate considers the person to have less subcutaneous tissue present or if administering medication other than insulin.)
14 Injects the medicine slowly over 10 to 30 seconds.
15 Withdraws the needle rapidly and applies gentle pressure with sterile gauze. Does not massage the area.
16 Ensures that all sharps and non-sharp waste are disposed of safely (including scooping method of re-sheathing and transportation of sharps) and in accordance with locally approved procedures.
17 Cleans hands with alcohol hand rub, or washes with soap and water and dries with paper towels, following WHO guidelines – verbalisation accepted.
18 Signs and dates medicines administration record (prompt permitted).
19 Acts professionally throughout the procedure in accordance with NMC (2018) ‘The Code: Professional standards of practice and behaviour for nurses, midwives and nursing associates’.
How knowledge of these criterias will help for your OSCE Training?
Information about these marking criterias will help you adjust time for your procedures NMC OSCE and hence practice effectively.
Conclusion
Its very important for nurses attempting NMC OSCE to be aware of these marking criterias. Many candidates are failing in OSCE because of lack of knowledge of these essential criterias.
Hopes this article helps you to make your prepartion for NMC OSCE fruitful, for more article updates on NMC OSCE.
Latest Adult Nursing Marking Criteria September 2021 – Download Here
Various time limits for NMC OSCE Stations 2022 – Download Here
PDF article on July 19th Update – Adult Nursing Marking Criteria July 19 2019 NMC OSC
PDF article on (May 24 2019) adult nursing marking criteria can be downloaded Adult Nursing Marking Criteria May 24 2019 NMC OSCE.
Full pdf on adult nursing marking criteria (old one) can be downloaded here
Please don’t hesitate to share this article to your friends preparing for NMC OSCE.